Category: New World

New World: Aeternum – Best Archetypes For Solo Players

In the vast and mysterious world of New World: Aeternum, players can find countless adventures, from exploring lush landscapes and battling monstrous creatures to conquering epic quests and treasure-filled expeditions. While the game encourages teamwork and collaboration, many players prefer to tackle its challenges solo. If you’re one of those lone adventurers, choosing the right archetype—combination of weapons, attributes, and playstyle—is crucial for survival and success.

In this guide, we’ll explore the best archetypes for solo players in New World Coins, discussing their strengths, weaknesses, and how to maximize their effectiveness in Aeternum.

Why Choose the Right Archetype for Solo Play?

Solo players face unique challenges compared to group players. They don’t have healers to keep them alive, tanks to soak up damage, or DPS allies to help take down enemies quickly. As a result, the ideal solo archetype should strike a balance between damage output, survivability, and sustainability.

The best archetypes for solo play should excel in:

Sustainability: Self-healing, crowd control, or damage reduction.

Damage Output: The ability to kill enemies efficiently without dragging out fights.

Mobility: The capability to avoid damage and reposition effectively.

Versatility: Adaptability to handle both PvE and PvP encounters.

1. The Berserker (Hatchet + Life Staff)

The Berserker archetype is one of the strongest solo builds in New World due to its combination of self-healing, damage output, and survivability.

Primary Weapon: Hatchet

The Hatchet’s Berserker Tree offers incredible self-sustain through the Berserk ability, which heals you over time while active.

 Passive perks such as Defy Death allow you to cheat death once every 75 seconds, making it a fantastic weapon for solo players who often face tough enemies.

The Hatchet’s high attack speed and mobility make it an excellent choice for solo combat.

Secondary Weapon: Life Staff

The Life Staff provides consistent self-healing through abilities like Sacred Ground and Beacon, ensuring you stay alive even during extended fights.

Pairing the Life Staff with medium or heavy armor can make you nearly unkillable in solo PvE content.

Attributes:

Focus on Strength (for Hatchet damage) and Focus (for Life Staff scaling).

Allocate some points into Constitution for added health and survivability.

Playstyle:

Open fights with the Life Staff, setting down Sacred Ground and using Beacon.

Switch to the Hatchet and activate Berserk to dish out high damage while regenerating health.

Use the Hatchet’s mobility to dodge heavy attacks and reposition as needed.

2. The Sharpshooter (Bow + Spear)

For solo players who enjoy ranged combat and precise strikes, the Sharpshooter archetype offers excellent damage and utility.

Primary Weapon: Bow

The Bow excels at dealing high single-target damage from a distance, allowing you to eliminate enemies before they can close the gap.

Abilities like Poison Shot and Penetrating Shot provide sustained damage over time and the ability to hit multiple enemies.

Secondary Weapon: Spear

The Spear complements the Bow by providing crowd control and close-range capabilities.

Abilities like Sweep and Vault Kick allow you to knock down or stun enemies, giving you time to reposition or finish them off.

Attributes:

Prioritize Dexterity, as it scales both the Bow and Spear.

Add some points to Constitution for survivability.

Playstyle:

Start combat by kiting enemies with the Bow, keeping them at range with abilities like Evade Shot.

If enemies close the distance, switch to the Spear to immobilize or stun them.

Use the Spear’s mobility and Bow’s range to maintain control of the fight.

3. The Elementalist (Fire Staff + Ice Gauntlet)

For players who prefer magical archetypes, the Elementalist is a powerful option, offering high AoE damage and crowd control.

Primary Weapon: Fire Staff

The Fire Staff provides high damage output through abilities like Pillar of Fire and Incinerate.

 Its Burnout ability allows for mobility, making it easier to escape dangerous situations.

Secondary Weapon: Ice Gauntlet

The Ice Gauntlet complements the Fire Staff with crowd-control abilities such as Ice Storm and Entombed, which allow you to slow or freeze enemies.

Entombed is particularly useful for regaining mana or buying time during tough fights.

Attributes:

Focus entirely on Intelligence, as both weapons scale with this attribute.

Add some points to Constitution for better survivability.

Playstyle:

Start by casting Ice Storm to slow enemies and control the battlefield.

Follow up with Pillar of Fire and Incinerate for massive damage.

Use Burnout or Entombed to escape or recover mana as needed.

4. The Bruiser (Great Axe + War Hammer)

For solo players who want to dominate melee combat, the Bruiser is an excellent choice. This archetype combines heavy-hitting attacks with crowd control and self-sustain.

Primary Weapon: Great Axe

The Great Axe’s Reap ability allows you to pull enemies closer while healing yourself.

Gravity Well is perfect for controlling multiple enemies, especially in elite zones or PvP encounters.

Secondary Weapon: War Hammer

The War Hammer offers powerful crowd control through abilities like Shockwave and Wrecking Ball.

Its heavy-hitting attacks can deal devastating damage to groups of enemies.

Attributes:

Invest heavily in Strength, as both weapons scale with this attribute.

Add some points to Constitution for extra health.

Playstyle:

Use the Great Axe to close the distance with enemies and heal yourself with Reap.

Switch to the War Hammer when facing multiple enemies, using crowd-control abilities to keep them in check.

Utilize heavy armor to maximize your survivability in close combat.

5. The Shadowblade (Rapier + Void Gauntlet)

The Shadowblade archetype is a versatile build that excels at hit-and-run tactics, offering high single-target damage and self-healing.

Primary Weapon: Rapier

The Rapier is a highly agile weapon with strong single-target damage.

Abilities like Evade and Riposte allow you to dodge and counter enemy attacks effectively.

Secondary Weapon: Void Gauntlet

The Void Gauntlet provides both damage and self-healing through abilities like Oblivion and Essence Rupture.

Its Decay tree offers ranged attacks and healing over time, making it a valuable tool for solo players.

Attributes:

Focus on Dexterity for the Rapier and Focus for the Void Gauntlet.

Add some points to Constitution for better survivability.

Playstyle:

Use the Void Gauntlet to debuff enemies and heal yourself with Essence Rupture.

Switch to the Rapier for high burst damage, using its agility to avoid incoming attacks.

Combine the two weapons’ abilities for a balanced approach to offense and defense.

Conclusion

Solo players in buy New World Gold have a variety of archetypes to choose from, each offering unique strengths and playstyles. Whether you prefer the raw power of the Berserker, the precision of the Sharpshooter, or the magical might of the Elementalist, there’s a build to suit every playstyle.

To maximize your success, focus on creating a balanced archetype that meets the challenges of Aeternum head-on. By investing in the right attributes, mastering your weapons, and refining your playstyle, you’ll become a formidable force, even when adventuring alone.

New World: How To Level Your Mount Fast & Unlock Wolves/Lions In Rise Of The Angry Earth?

How can you max out your riding skill fast and unlock the wolf and lion mounts in New World Rise of the Angry Earth?

With mounts being released with the Rise of the Angry Earth expansion, everyone is rushing to max out their riding skill so they can hit top speeds and unlock the new wolf and lion mounts.

This new skill is very different from the previous skills we’ve had in New World, but it’s really easy and simple once you fully understand it.

The nice thing about the riding skill is there’s a more casual way to level it that takes a bit longer to level but requires little to no effort or you can do the races to speed through the whole skill line.

New World: How To Level Your Mount Fast & Unlock Wolves/Lions In Rise Of The Angry Earth?

How To Get Mount?

First off, if you don’t have a mount already, you need to be a minimum level of 25 and own the Rise of the Angry Earth expansion.

Then, head over to complete the quest, ‘My Kingdom for a Horse’. You’ll see a golden horseshoe on the map where it can be started. It’s over and everfall.

Once the quest is done, you unlock your mount. Simply equip it and it’s time to get started with the leveling.

Method 1

Let’s start off with the casual way of leveling the skill.

For those of you who don’t enjoy the races, if you plan on racing, you should still do this method on the side to maximize efficiency.

Basically, you just need to make sure you’re feeding your Mount Vittles every day. You can feed your mount three times a day and you’re going to want to be using the maximum tier your riding skill lets you use.

New World Mount Vittles
  1. From level one, you’ll skip Basic Mount Vittles and go straight to Mount Vittles since you’ll be getting 2,500 XP per instead of the 1,250 from the basic ones.
  2. Then, once you get up to level 75 riding, switch over to Hearty Mount Vittles, which will now be giving you 8,000 XP per.
  3. At riding 150 for the final push to 250, you will be using Luxury Mount Vittles.

Because the riding skill currently has no aptitude levels and just ends at 250, these items will always be extremely cheap on the Trade Post. So, even though you can cook them easily or get them as mount quest rewards, if you ever don’t have enough to use three of the highest tier available to you for the day, just head over to the Trade Post and buy some using your New World Coins.

While mounted, put these vittles on your hot bar and use them to start feeding your mount. Using three of these a day will slowly but surely max out your riding skill.

Also Read: 5 Invaluable Tips That Help You To Be The Best In New World!

Method 2

But if you want to be ultra efficient with your leveling, you should do this and do the next method we’re going to be talking about as well – Time Trials.

Doing one of the Time Trials is not only the fastest way to level up your mounts, but it’s what’s required for you to get your wolf and lion mounts.

There’s basically two different versions of these Time Trials – tours & rallies.

  1. Tours are the more annoying of the bunch, having you go from point A to point B in a certain amount of time, which if you aren’t good at map navigation can be a bit of a pain.
  2. Rallies have you doing the same thing, but there are checkpoints along the way, making it so that you don’t have to open your map to complete these.

After acquiring your mount, you’ll be given a quest with five of these races to go around the world and complete.

Get Wolf

The first batch is really easy and you can get done pretty quickly, which will leave you around level 90 riding.

Then, they’ll send you on another five races a bit longer ones, which will bring you to around 120 riding and finally giving you the quest to get your wolf mount called ‘A Pack Of Knaves’.

After you get your wolf, you’ll have to prove yourself to it on another set of five races, which again get longer and more difficult. But they will leave you around level 150 riding.

New World Wolf Mount

Get Lion

The next set of five will take you to 220 riding and allow you to go on a quest to unlock the lion mount called ‘A Matter of Pride’.

After that, they’ll keep giving you a couple more sets of five. But after the next set, you should hit level 250 and be done with the skill. You can skip the rest of the quests unless you’re a completionist.

You’ll now have unlocked all the different kinds of mounts plus gotten the vital speed boosts from levels 50, 100, 150, and 200. Plus, you can equip mount straps and shoes now, which will give you various bonuses to buy New World Gold coins your mount.

New World Lion Mount

I know the mount races can get long and tedious, but count yourselves lucky. When the mounts first came out, these were even longer, so they’ve been shortened since.

If you’re trying to race to max speed, then definitely do a combination of both. But if all you want is a horse and you can only play a little every day, feel free to do the passive method that covers how to max out your riding skill fast and unlock the wolves and lion mounts.

Thoughts on Balancing Shirking Heals in Solo PvP

The Shirking combo definitely required a nerf, but it should still have its strength. The absence of sufficient self-sustain makes it nearly impossible for a solo player to take on a healer-oriented team.

I primarily engage in solo PvP and have been utilizing the potent Shirking Heals combined with the Ankh. Do I believe it was overpowered and in need of adjustments? Absolutely, it required attention. However, from the perspective of an arena and open-world PvP enthusiast, it represented the best solo player experience in this game’s PvP scene. For this reason, I have invested a lot of energy and New World Gold coins. This build offered a crucial level of self-sustain, enabling me to contend with teams containing healers. If the Shirking Heals build is nerfed too severely, my already challenging arena matches against healer teams would become nearly insurmountable.

In essence, I believe that Shirking should remain strong. I haven’t had the opportunity to test the nerf yet, so perhaps it’s now in a balanced state. Nonetheless, a more significant priority should be addressing healer balance. Many times, as a damage dealer, I find it nearly impossible to eliminate a player focused on healing or the healer themselves. While there might be specific builds capable of countering this, I’ve also noticed this concern echoed by numerous players within this community.

In hindsight, it’s a somewhat controversial perspective, but a solo player shouldn’t necessarily expect to achieve a competitive edge in 1vX scenarios. By default, they are at a numerical disadvantage and should experience frequent losses. MMOs are inherently social games, and teamwork should be encouraged.

Furthermore, teams composed of 2 DPS and a healer should have a natural advantage over teams with 3 DPS. The latter combination should ideally possess a higher win rate, given their more balanced composition. However, it might require some adjustments to attain this desired win rate, particularly because healers currently win too frequently.

Teams consisting of 3 DPS should not be consistently prevailing to the same extent. The current state of PvP is often perceived as enjoyable and relatively balanced in a way that playing with five duelists (aggressive killers) in Valorant can be fun. It allows for an aggressive playstyle with everyone on an equal footing when both teams are filled with duelists.

However, a well-constructed team with a mix of duelists, controllers (smoke-based roles), initiators (entry abilities), and sentinels (defensive roles) will lead to more team success at the expense of individual, short-term enjoyment. It also caters to a wider variety of player preferences, as not everyone wants to play as duelists exclusively.

Hence, if you assemble a team of five duelists against another team with a more balanced composition, you should expect to struggle. Yet, in New World, some individuals express discontent regarding this situation.

In conclusion, even with the Shirking Heals and Ankh combination, it’s not advisable for 3 DPS to be on an equal footing with 2 DPS and a Healer. Balancing the roles in a team should be a priority in creating a more fair and engaging PvP experience. Importantly, I was disappointed that I used more New World Coins to improve my character and achieved very little.

New World Rare Cooking Herbs Guide

If you’re a person who is into crafting, there are chances that you’ve already found several uses for herbs. It’s worth noting that herbs play an important role in the early game content, and by that, I mean, to level up your arcana and cooking skills for new world herbs.

The one thing that players are often curious about is the special resources used while cooking. For instance, Basil, Garlic, Cinnamon, Paprika, etc., are quite rare to obtain while harvesting new world herbs.

Rare Herbs

Cinnamon is a rare herb that can be gathered from various harvesting spots in the game. You can find several herbs scattered across the starting zones on Aeternum, and to be more precise; the grassy areas in every zone for new world spices. Whenever you harvest one with the help of your sickle, there will be a random chance to obtain rare herbs.

Once you get one, you can insert them into different cooking recipes, precisely the second item slot. These herbs play an important role in the game as you receive additional cooking experience from them.

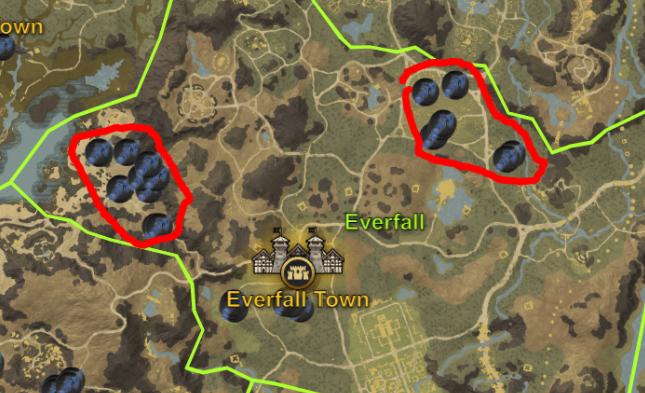
Every region in the game has different herbs to offer with different rarities (including new world hyssop). For instance, the coastal regions to the south have a better chance of obtaining Cinnamon. Whereas, Brightwood and Everfall are good for Basil, Windsward for Ginger, Everfall for Garlic, and the far eastern zones for Mint for new world spices. If you’re looking to obtain a specific herb then you need to travel around the settlements and look for them at the trading post.

Locations

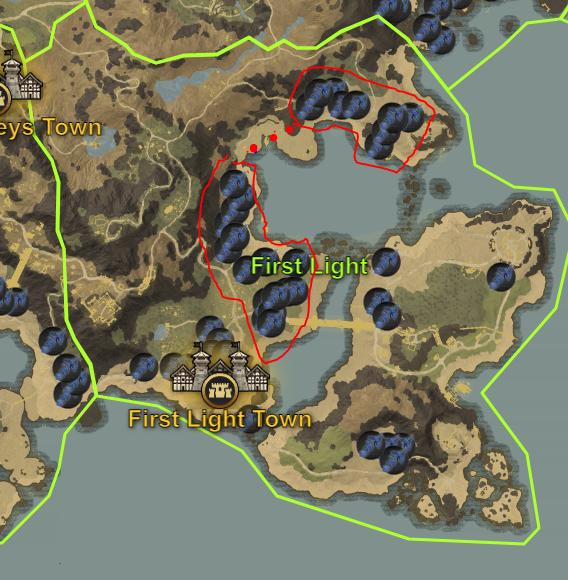
Do you want to locate some decent areas to harvest herbs? The best suggestion would be to check outside the settlements. For instance, the First Light’s settlement has several herb spots that lead to Dayspring Mills. There are also fields that surround the Monarch’s Bluff, Everlook, and Windsward settlements. Simply look for tall blue and purple-looking grass that can be harvested.